It will be new for all of us but creating this homeschool space gives me so much hope and excitement that they will love the time at home being taught by mom.
This post may contain affiliate links. As an Amazon Associate I earn from qualifying purchases at no additional cost to you. Please read our disclosure for more info.

2020 has been a whirlwind of emotions. Thankful for this extra time as a family, scared because of the unknown, sad for the ones who have been affected, angry because our normal has gone away, overwhelmed with homeschool and more. The emotions have been overwhelming and I know, especially for kids, it can be so hard to process.
They have been wanting to get outside and play at the park, go out to dinner, see their friends, go to the mall, etc. and we just can’t. They were ripped out of their classrooms and thrown into remote learning. I mean, as parents, I know how hard that really was! I mean it has been so long since Joe and I have been in school and so much of way children are taught has changed so becoming teacher over night and being thrown into becoming a homeschool was scary and hard.
Over the summer, the way school was going to be for the fall was unknown and we literally just found out that it was going to 100% remote learning with only 2.5 weeks left until school starts. I started freaking out. Where would they need to do it? What space can we transform into a learning area? Will they need to just be piled on the dining room table? How can they share a space with dad while he works? So many questions and honestly, so little time to figure it out.
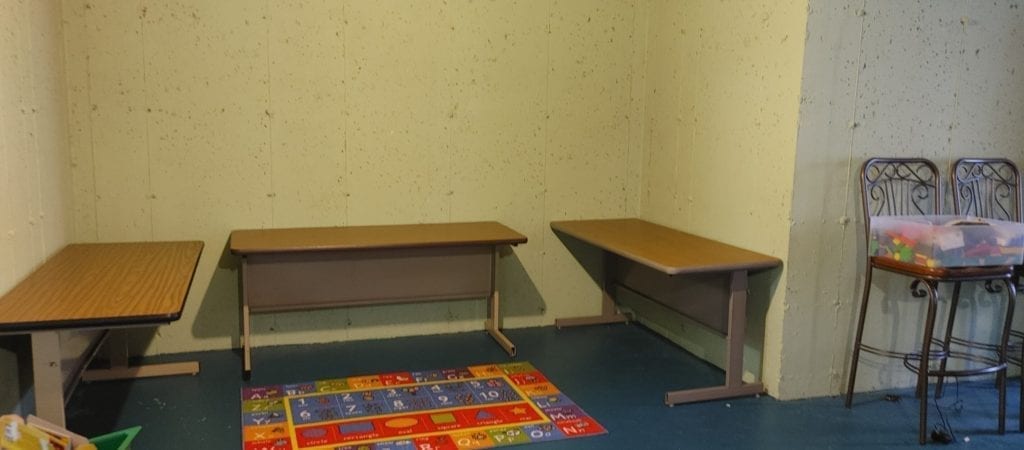
We have an unfinished basement that we have been slowly making into a nice playroom and hang out area for the kids. It has a small area that I was going to create as an “art station” for the kids and I just knew that it would be perfect for their new homeschool classroom.

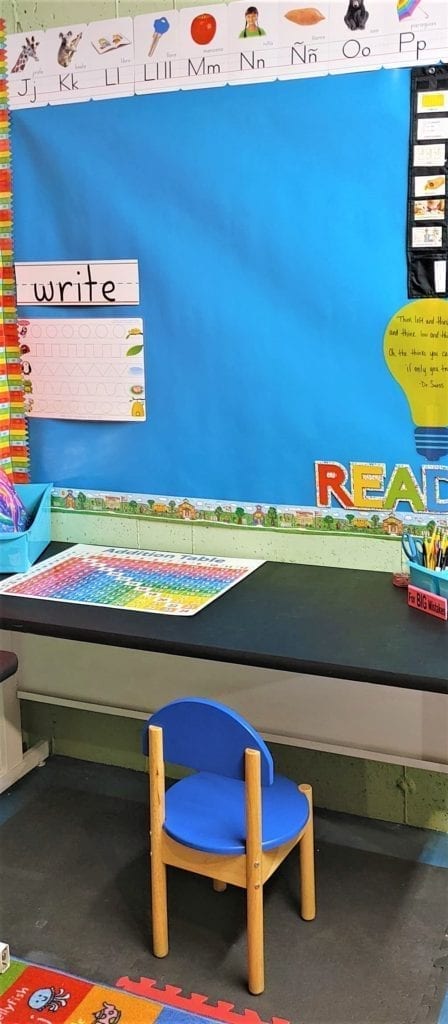
I got started right away! I was trying to find what can be hung on the concrete walls to give it more color and found this Better Than Paper and bought got it in red, teal, and lime green! It is fantastic! They wipe on / wipe off with dry erase markers which I love and the kids are ecstatic about! I added some cute Dr. Suess quotes around and can easily write things to go with the themes they are doing or subjects they need a little extra work on.
The paper is thick so tearing it will be a challenge (and a challenge I am sure the kiddos will gladly take!). I used Mavalus Tape to hold it up and it works phenomenally. It comes in almost exact matching colors as the Better Than Paper and holds the thickness of the paper to the concrete wall stronger than I could have hoped for! It is amazing!
Next was to border the paper. I knew that I wanted to border the tops and sides to kind of section off each color. Each color/wall/table was going to be for each of the kids.
I already had a border that I got from a garage sale that had a school, trees, a school bus and kids on it and I thought it was perfect for the beginning of the school year! I had JUST enough to cover the bottoms of the posters.

I found these cute crayon borders at Walmart in their back to school section and they were ONLY $1.00 each. Each pack came with 30 pieces. I decided to use these on the sides and in the corners to section off each wall and man did they turn out cute! They were super inexpensive and I only had to use 1.5 packs out of the 6 I bought so it was a steal!

For the top border, I knew EXACTLY what I wanted and this alphabet was perfect! I wanted ones that had a picture along with the letter underneath and would cover more of the concrete on the top. These measure around 7′ 5/8″ and covered it perfectly! Now, there weren’t enough letters to go around the entire size of the space so I decided to see if they had ones that matched but in Spanish. My kids LOVE learning Spanish and I knew how much it would excite them if I could find them. Well… I did and they are amazing! They are the exact size as the other border and just really pulled together everything that my kids love!

Once the border and paper was all set up – I started on the decorating aka the best and most fun part!
I found this Home Sweet Classroom set and fell in love with it! The set comes with a calendar, weather, today is/tomorrow will be, yesterday was, and more! I love the idea that the kids could put up what day it was, what the weather will be and kind of take control of the first part of their school day.
I also found a poster with the “Parts of Speech” and “Vowels”, and an addition/multiplication poster. I knew that they would be perfect for all of them and would add just what we needed and wanted in our little classroom. I also managed to find some “READ” and “WRITE” signs in the classroom decor section at Walmart with some sticky decals of a lightbulb and an apple. I plan to write down a “book of the day” or “story subject of the day” on each. All of our kids LOVE books and to write so I knew they would enjoy this little addition!
For their desks, there were 3 folding tables that were left here when we moved in so I just scooped those up and refurbished them (painted the legs white and painted the top chalk board paint)! They turned out so cute for the space!
I picked up some of these containers to hold their folders and notebooks and these to hold their crayons, markers, glue sticks, glue paste, pencils and colored pencils. I found some that matched the color of the paper on the walls and the kids love having their own and this momma does too! (No sharing crayons = no fighting over who broke the last purple! Small wins!)


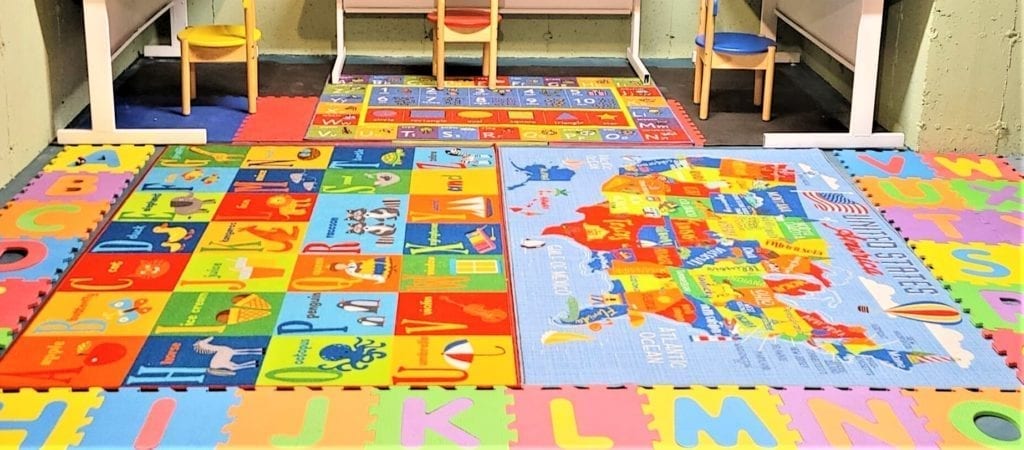
Since the floor is concrete, my parents gave us a couple large rubber mats and then some small alphabet and number mats (I think they got these from a garage sales around 8 years ago and they have held up through a LOT and still makes it so much more comfortable to sit on.) I put the large mats underneath the desks so that when the kids are sitting for hours at a time, they are much more comfortable!
I wanted to create a little bit more of a larger learning space for them and found these amazing large rugs for only $25.00 each at Costco. I mean talk about a steal! They were the perfect size (both were 7’10″x10′) for the space and so cute. One was the alphabet with pictures (for the little ones) and the other was a map of the United Stated (for our third grader). I put them next to each other and outlined them with the alphabet/number foam letters from my parents and it really turned out so cute! Take a look for yourself, doesn’t it really just tie everything together to create the most adorable homeschool!

I added a cute little “Home Sweet Classroom” that I hung from the ceiling and the entire space is so much more than what I even imagined! The chairs will be replaced with some comfortable folding chairs with their names on the backs so I will update with pictures of those once they are done but the children LOVED everything. They ran to their spaces and instantly started asking to do work (uhm… yay!!). I say this was a job well done on creating a fun and educational homeschool for the kiddos!
Here is the list of supplies I used! They are amazing!
– Better Than Paper
– Mavalus Tape
– ABC Border (English)
– ABC Border (Spanish)
– Home Sweet Classroom Bulletin Board
– Home Sweet Classroom Banner
– Storex Interlocking Book Bins
– Storex Large Caddy
– Smithsonian USA Map Rug
– Smithsonian Alphabet Rug
How have you had to set up for this new crazy world of ours? I would love to see your pictures!
xoxo,

Leave a Reply